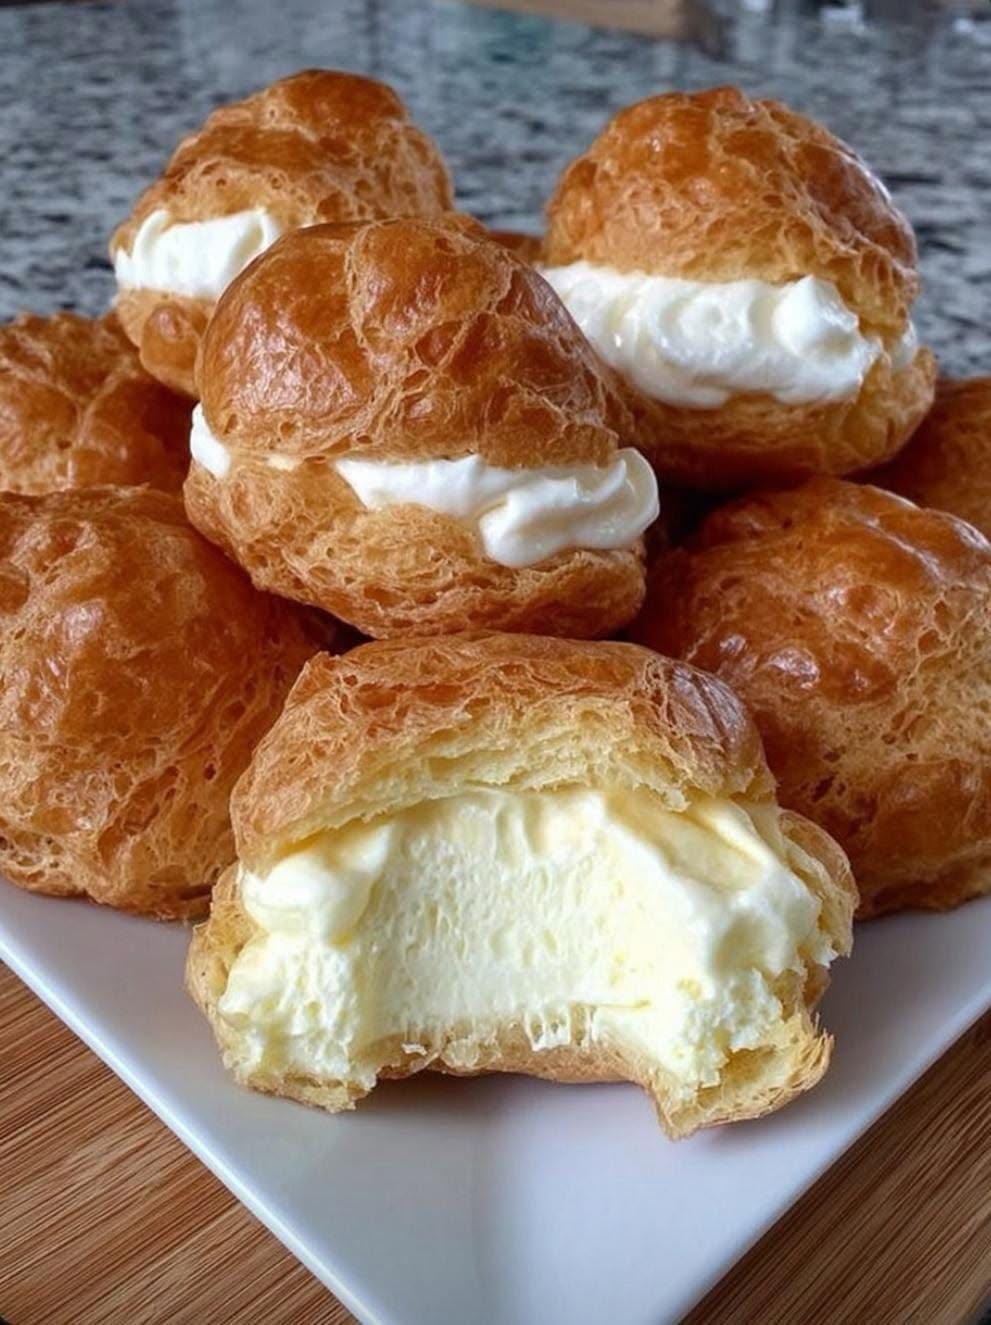
If you thought your favorite childhood dessert couldn't be improved, think again. This upgraded version of Mom's Famous Cream Puffs takes the nostalgic, pillowy goodness you remember and elevates it into a professional-grade pastry experience that will leave your guests begging for the recipe.
Imagine biting into a golden, shatteringly crisp shell that yields to a cloud of velvety, chilled vanilla cream. The aroma of toasted butter and warm vanilla wafts from the pastry, perfectly balancing the decadent, sweet center. These aren't just desserts; they are little bites of heaven that evoke memories of Sunday brunches and celebratory tea times. While traditional choux pastry can feel intimidating, this specific method—refined from a cherished family secret—is surprisingly approachable, making it a staple for home cooks who want to impress without spending hours in the kitchen. Whether you are a seasoned baker or a novice looking for a win, these cream puffs are about to become your new obsession.
Why You'll Love This Recipe
- Crowd-Pleasing Perfection: This recipe yields approximately 16 large, beautiful cream puffs, making it the ideal dessert for parties, showers, or family gatherings.
- Simple Pantry Staples: You likely already have the core ingredients—butter, eggs, flour, and milk—sitting in your kitchen right now.
- Foolproof Texture: By using a specific "hack" in the filling, we ensure a stable, thick cream that won't deflate or weep.
- Impressive Results: They look and taste like they came from a high-end French patisserie, yet the process is remarkably straightforward.
- Versatile Base: The choux pastry dough is incredibly reliable and can be used for eclairs, profiteroles, or savory gougères.
Ingredients You'll Need
For the Perfect Choux Pastry Shells
- 1 Stick (8 Tablespoons) Unsalted Butter: Using high-quality unsalted butter ensures you have control over the salt content, providing a rich, buttery foundation for the dough.
- 1 Cup Water: Water is essential here because it creates the steam necessary to make the pastry puff up in the oven.
- 1 Teaspoon Vanilla Extract: This adds a subtle aromatic depth to the dough itself, making it taste much more sophisticated than plain pastry.
- 4 Large Eggs: Eggs are the "magic" ingredient in choux pastry. They provide the structure, moisture, and the leavening power required for that iconic hollow center.
- 1 Cup All-Purpose Flour: This provides the gluten structure needed to hold the steam inside the shell as it expands.
For Mom's Famous Stabilized Filling
- 1 Pint Heavy Whipping Cream: This is the base of your luscious filling. Ensure it is very cold for the best volume.
- 1 Package (3.4 Ounces) Instant Vanilla Pudding Mix: This is the secret weapon! The cornstarch and stabilizers in the pudding mix prevent the whipped cream from collapsing, ensuring a thick, luscious texture.
- 1/3 Cup Milk: Used to slightly thin the pudding mix to the perfect consistency before it is whipped into the cream.
Step-by-Step Instructions for Success
- Create the Flavorful Base: Start by combining your unsalted butter, water, and vanilla extract in a medium-sized, heavy-bottomed saucepan. Place the pan over medium heat and bring the mixture to a gentle boil. It is crucial that the butter is completely melted before the water reaches a rolling boil. This ensures that the fat and water are properly emulsified, which is the first step in creating a smooth dough.
- Develop the Panade: Once the liquid is boiling, remove the pan from the heat (or turn it to low) and dump in the entire cup of flour at once. Using a sturdy wooden spoon or a spatula, stir vigorously and constantly. You are looking for the mixture to form a cohesive ball of dough that pulls away cleanly from the sides of the pot. Continue cooking and stirring for about 1-2 minutes; this "cooks out" the raw flour taste and dries out the dough just enough to allow it to absorb the eggs later.
- The Essential Cooling Phase: Transfer the dough ball to a clean mixing bowl or a stand mixer fitted with a paddle attachment. Let it cool for at least 5 to 10 minutes. This is a critical step that many beginners skip! If you add the eggs while the dough is steaming hot, you risk scrambling them, which will ruin the texture of your pastry. You want the dough to be warm to the touch, but not hot.
- Incorporate the Eggs: With the mixer on medium-low speed, add your four eggs one at a time. Do not dump them all in at once! After adding the first egg, beat the mixture thoroughly until the egg is completely incorporated and the dough looks smooth. Repeat this process for each egg. By the time you add the fourth egg, the dough should look glossy, smooth, and slightly heavy. If it looks too thick or "clumpy," your eggs might have been small; if it looks like soup, you may have added too much. It should be a thick, pipeable paste.
- Shape and Bake: Preheat your oven to 400°F (200°C) and line two large baking sheets with parchment paper. Using a spoon or a piping bag, drop mounds of dough onto the sheets. For the best look, try to keep them relatively uniform in size—about the size of a golf ball. Bake for 25 to 30 minutes. Do not open the oven door during the first 20 minutes! Opening the door lets out the steam, which can cause the puffs to deflate prematurely. The puffs are done when they are golden brown and feel light and hollow when tapped.
- Cool and Prepare for Filling: Once out of the oven, let the cream puffs cool completely on a wire rack. If they are even slightly warm, your cream filling will melt. Once cooled, use a serrated knife to carefully slice the tops off, or slice them in half horizontally. If you prefer a cleaner look, you can poke a small hole in the side and pipe the filling in.
- Make the Famous Filling: In a large chilled bowl, combine the heavy cream, the instant vanilla pudding mix, and the milk. Using a hand mixer or a stand mixer, beat the mixture on high speed. Continue beating until the mixture reaches stiff peaks—meaning when you lift the whisk, the cream stands straight up without drooping. This "pudding hack" creates a filling that is much more stable than standard whipped cream.
- The Final Assembly: Using a piping bag or a large spoon, generously fill the hollow centers of your cooled pastry shells with the vanilla cream. For a professional touch, place the pastry tops back on and finish with a heavy dusting of powdered sugar through a fine-mesh sieve.
Pro Tips & Secrets for Perfect Cream Puffs
Mastering choux pastry is all about understanding moisture and temperature. Here are my expert secrets to ensure you get perfect results every single time:
- Temperature Matters: Always use room-temperature eggs. Cold eggs can cause the warm dough to seize and clump, making it difficult to achieve a smooth emulsion.
- Watch the Dough Consistency: When adding the eggs, stop if the dough reaches a "V" shape when you lift the paddle. If it’s too runny, you won't get a rise; if it's too stiff, it won't be airy.
- Don't Peek! I cannot stress this enough: do not open the oven door while they are rising. The steam is the only thing holding those walls up. If the steam escapes, your puffs will collapse into flat pancakes.
- Avoid Soggy Shells: If you aren't serving them immediately, store the shells in an airtight container separately from the filling. Only fill them right before serving to maintain that crucial crunch.
- Use a Scale: For the most consistent results, weigh your flour and butter. Volume measurements (cups) can vary wildly depending on how tightly you pack the flour.
Variations & Substitutions
Once you have mastered the base recipe, the culinary possibilities are endless! Try these variations to keep your dessert menu exciting:
- Chocolate Lovers Dream: Swap the vanilla pudding for chocolate instant pudding, or add cocoa powder to the pastry dough. Drizzle the finished puffs with melted dark chocolate.
- Fresh Berry Delight: Fold fresh macerated strawberries or raspberries into your cream filling for a fruity, bright twist.
- Espresso Infusion: Add a teaspoon of instant espresso powder to the cream filling to create a sophisticated mocha-flavored cream puff.
- Savory Gougères: Skip the vanilla and sugar! Add grated Gruyère cheese and a pinch of cayenne pepper to the dough for a delicious savory appetizer.
Serving Suggestions & Pairings
To elevate these cream puffs from a simple snack to a gourmet experience, consider your presentation. Serve them on a tiered dessert stand for a classic afternoon tea vibe. For a more modern look, dust them with cocoa powder or even edible gold leaf.
Drink Pairings: A light, fruity dessert wine like a Moscato d'Asti is a perfect match. If you prefer something non-alcoholic, a steaming cup of Earl Grey tea or a rich, dark roast coffee will beautifully complement the buttery pastry and sweet vanilla cream. For a brunch setting, a glass of chilled Prosecco provides a lovely effervescent contrast to the creamy texture.
Make-Ahead, Storage & Reheating Tips
Can you make these ahead of time? Yes and no. You can bake the pastry shells up to two days in advance. Store the cooled, unfilled shells in an airtight container at room temperature to keep them crisp. However, do not fill them until you are ready to serve, as the moisture from the cream will inevitably soften the pastry.
Storing the Filling: The cream filling can be made up to 24 hours in advance. Keep it in an airtight container in the refrigerator. If it loses some volume, give it a quick whisk before piping.
Frequently Asked Questions (FAQ)
Why did my cream puffs deflate after I took them out of the oven?
This usually happens for one of two reasons: either the oven door was opened too early, letting the steam escape, or the puffs weren't baked long enough to set their internal structure. Even if they look golden, they need enough time for the moisture to evaporate and the walls to solidify.
Can I use a different type of flour?
While you can try using cake flour, all-purpose flour is recommended because it provides the specific protein content needed to create the structure that holds the steam. Using bread flour might make them too tough, while cake flour might make them too fragile.
My dough is too thick/stiff after adding the eggs. What should I do?
If the dough is too heavy and won't form a smooth paste, you may have added too much flour during the "panade" stage or your eggs were too small. You can try adding one more egg, but add it very slowly to avoid making the dough too runny.
How do I make the cream filling more stable?
The secret is the instant pudding mix! The starches in the pudding act as a stabilizer. If you want to skip the pudding, you can use a stabilizer like gelatin or a professional cream stabilizer, but the pudding method is the easiest and most delicious "home cook" hack.
The Only Cream Puff Recipe You'll Ever Need
There you have it—the ultimate, upgraded version of Mom's Famous Cream Puffs. This recipe strikes the perfect balance between nostalgic comfort and professional elegance. By mastering the science of the choux pastry and utilizing the stability of the pudding-cream filling, you are no longer just following a recipe; you are crafting a masterpiece. These puffs are guaranteed to be the star of your next gathering and the recipe your friends will be talking about for weeks.
Did you try this recipe? I would love to hear how they turned out! Please leave a comment below with your results, or share your beautiful creations with me on social media. Don't forget to pin this recipe to your favorite dessert board!